


The storm has passed. You step outside to find shingles scattered across your yard, dents in your gutters, and a sinking feeling in your stomach. For Allen homeowners, this scenario is all too familiar. Collin County sits in one of the most hail-prone regions in the country, and in 2025 alone, weather services recorded 21 hail reports within 10 miles of Allen, with hailstones reaching up to 2.25 inches in diameter. The Dallas-Fort Worth metroplex averages six to eight significant hail events per year, and any one of them can leave your roof compromised.
What you do in the first 24 to 48 hours after storm damage can determine whether you face a manageable repair or a catastrophic restoration project. Secondary water damage from an unprotected roof accounts for up to 80 percent of total storm-related repair costs, and mold can begin growing within 24 to 48 hours of moisture intrusion. Acting quickly and correctly protects your home, your family, and your insurance claim. This guide walks you through every step, from ensuring safety to completing repairs.
Step 1: Ensure Safety First
Before you assess any damage, wait until the storm has completely passed. Lightning, high winds, and continuing hail pose serious risks. Once conditions are safe, walk around the exterior of your property and look for immediate hazards: downed power lines, broken glass, or structural damage that makes any area unsafe to approach. If you see a downed power line, stay far away and call 911 immediately.
Do not climb onto your roof. Damaged roofing materials can be unstable, wet surfaces are slippery, and improper foot placement can cause additional damage to already compromised shingles. Leave roof access to professionals who have the proper safety equipment and training. If you can safely access your attic, a quick look from inside can reveal daylight coming through the roof deck, wet insulation, or active dripping.
If water is actively entering your home, take immediate steps to minimize interior damage. Move furniture, electronics, and valuables away from the affected area. Place buckets or containers under active drips. If you see a bulging area in your ceiling where water is pooling, carefully poke a small hole in the center to release the water into a bucket. This controlled release prevents a larger section of your ceiling from collapsing unexpectedly.
Step 2: Document Everything Before Touching Anything
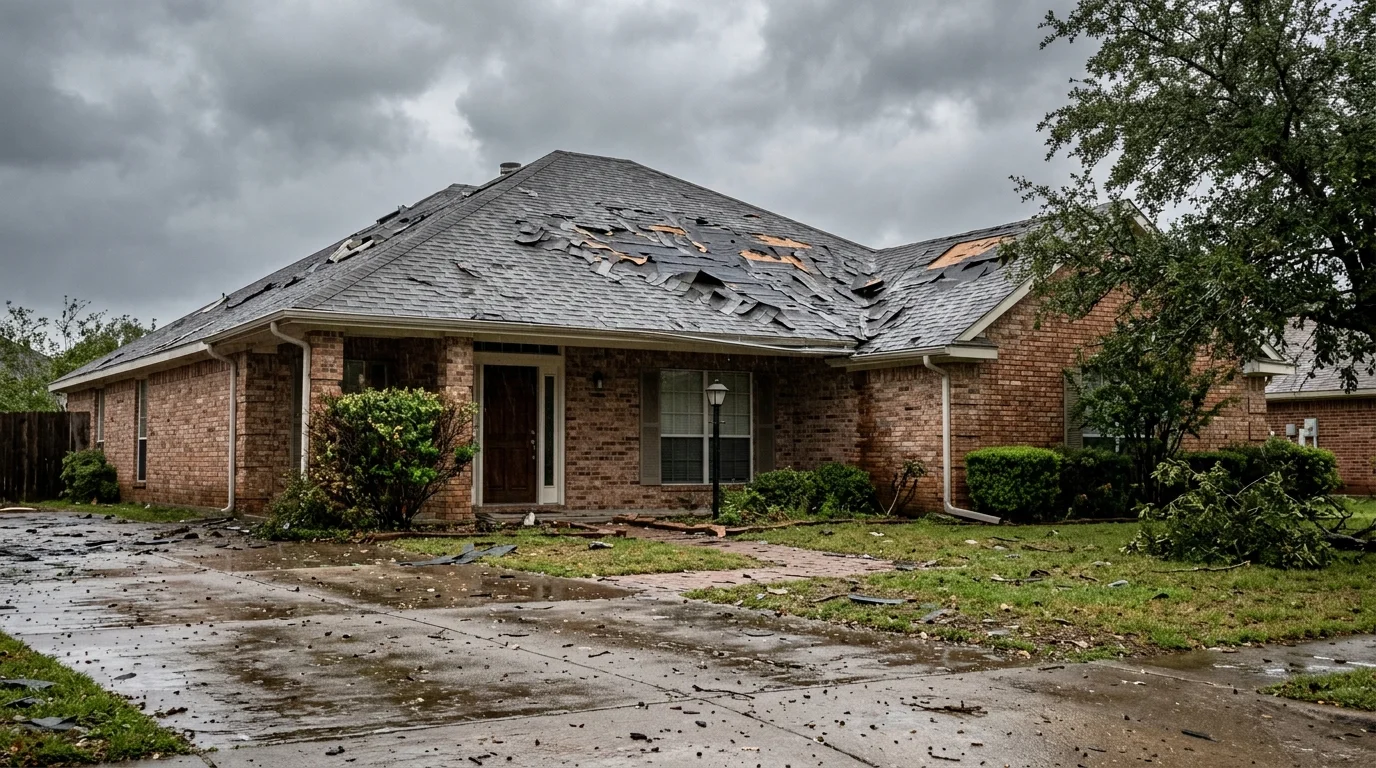
Documentation forms the foundation of a successful insurance claim. Insurance adjusters rely on clear, timestamped evidence to process claims, and the more thorough your proof, the harder it is for them to dispute the damage. Think of this as building a case file for your roof.
Start by photographing your roof from ground level, capturing wide shots that show the overall roofline from multiple angles. Then take close-up photos of specific damage: missing or displaced shingles, dented gutters, damaged vents, and any debris scattered in your yard. Document damage to other exterior elements like siding, windows, and fencing, as these help demonstrate the severity of the storm.
Move inside and photograph any interior damage: water stains on ceilings or walls, wet insulation in the attic, peeling paint, or mold growth. Video documentation can be even more effective than photos alone. Walk around your property narrating what you observe, panning slowly across damaged areas so the camera captures details.
Enable date and time stamps on your camera or phone, or note the exact date and time separately. Save weather reports and official hail size measurements from the National Weather Service. This information strengthens your claim by linking the damage to a specific weather event. If your neighbors also experienced damage, note that as well, since widespread damage in a neighborhood supports individual claims.
Step 3: Prevent Further Damage
Most insurance policies require homeowners to take reasonable steps to prevent additional damage after a covered event. Failing to mitigate damage can jeopardize your claim, as insurers may argue that some of the loss resulted from your inaction rather than the storm itself.
For emergency roofing situations where your roof is actively exposed, professional tarping is the most effective temporary solution. A properly installed tarp can protect your home for 30 to 90 days while you navigate the claims process and schedule permanent repairs. Call a professional for steep roofs, large damaged areas, or any situation where safety is a concern. Emergency tarping costs typically range from $300 to $1,200 depending on roof size and accessibility, and this expense is usually reimbursable under your insurance policy as a mitigation measure.
Cover broken windows and any holes in your exterior to prevent rain, wind, and debris from entering. Remove standing water from interior spaces. Keep all receipts for temporary repairs and emergency materials, as these costs are typically covered when the underlying damage is a covered peril. However, do not make permanent repairs before the insurance adjuster sees the damage. Permanent fixes completed before the adjuster's visit can complicate your claim and may not be fully reimbursed.
Step 4: Contact Your Insurance Company Promptly
File your claim as soon as possible after documenting the damage. Texas law gives homeowners one year from the date of loss to file a claim, but waiting offers no advantages. Evidence degrades over time, memories fade, and insurers may question why you delayed if the damage was truly urgent. Filing immediately protects your rights and starts the clock on the insurer's response obligations.
Call your insurance company's claims hotline with your policy number and documentation ready. Provide a clear, factual account of the damage and note that you have photos and video to support your claim. The representative will assign you a claim number, which you should use in every subsequent communication. Texas Insurance Code Section 2707 requires insurers to acknowledge your claim within 15 days and provide the name of the assigned adjuster along with your rights under the policy.
Before the adjuster arrives, understand your policy terms. Most Texas homeowner policies carry wind and hail deductibles expressed as a percentage of your dwelling coverage, typically 1 to 2 percent. On a home insured at $400,000 with a 2 percent deductible, you would pay $8,000 out of pocket before insurance covers anything. Also confirm whether you have Replacement Cost Value coverage, which pays the full cost to replace your roof with similar materials, or Actual Cash Value coverage, which deducts depreciation based on your roof's age.
Step 5: Schedule a Professional Roof Inspection
While your photos provide valuable evidence, a professional roof inspection uncovers damage that untrained eyes miss. Storm damage is often deceptive. Your shingle roofing may look fine from the ground, but closer examination often reveals bruised shingles, cracked underlayment, or compromised flashing that will lead to leaks months later if not addressed.
A qualified roofing contractor in Allen will walk your roof, examine every section, and document all damage with photos and detailed notes. They will check areas that insurance adjusters sometimes overlook: pipe boots and vent seals, flashing around chimneys and skylights, ridge caps, and the condition of the roof deck where visible. The contractor's written inspection report and estimate give you a comparison point when the adjuster provides their assessment.
Schedule this inspection before the adjuster arrives if possible. Having an independent assessment in hand strengthens your position. Request that your contractor be present during the adjuster's inspection. An experienced contractor knows exactly where to show the adjuster damage that might otherwise be missed, and their presence can mean the difference between a partial repair approval and a full roof replacement approval.
Step 6: Be Present During the Adjuster's Inspection
The insurance adjuster's job is to verify the damage and determine how much the insurer should pay. Remember that the adjuster works for the insurance company, not for you. Their assessment may not always align with your contractor's findings, which is why your own documentation and independent inspection matter so much.
Be present during the inspection whenever possible. Walk the adjuster through your documentation, pointing out every damage area you have photographed, any interior water stains, and the findings from your contractor's report. Ask questions throughout: What are they noting? What do they consider storm-related versus pre-existing? Are they documenting all the areas your contractor identified?
If your roofing contractor can meet the adjuster on-site, this often leads to better outcomes. The contractor can walk the roof with the adjuster, point out damage that might be missed, and explain why certain repairs are necessary. Adjusters are not always roofing experts, and having a professional present ensures that subtle but significant damage gets documented properly.
Step 7: Review the Estimate and Settlement Offer
After the adjuster's visit, you will receive a written estimate and settlement offer. Review this document carefully, comparing it line by line against your contractor's assessment. Look for discrepancies in the scope of work, material specifications, quantities, and pricing. Adjusters sometimes miss damage, underestimate the extent of repairs needed, or use pricing that does not reflect current market rates.
If you have Replacement Cost Value coverage, your initial payment will typically be the Actual Cash Value amount, which accounts for depreciation based on your roof's age. The remaining amount, called recoverable depreciation or holdback, is paid after you complete repairs and submit documentation proving the work was done. This two-payment structure ensures policyholders actually use the funds for repairs.
If the adjuster's estimate is significantly lower than your contractor's, you have the right to file a supplement request. Submit your contractor's detailed estimate along with a written explanation of why the additional work is necessary. Texas Insurance Code Section 2706 requires insurers to approve or deny claims within 30 days and respond to supplements within the same timeframe. If disputes continue, you can request a re-inspection, hire a public adjuster to represent your interests, or consult with an attorney who specializes in insurance claims.
Step 8: Choose the Right Contractor and Complete Repairs
After a major storm, out-of-town roofing crews sweep into neighborhoods offering quick, cheap repairs. These storm chasers often do substandard work and disappear before problems emerge, leaving homeowners with no recourse. Protect yourself by choosing a reputable local contractor with an established presence in the community.
Red flags to watch for include: offers to waive your deductible (illegal in Texas under HB 2102 and a sign of potential fraud), high-pressure tactics pushing you to sign immediately, requests for large upfront deposits, no local address or verifiable history, and reluctance to provide references or proof of insurance. Legitimate contractors will have a physical address, proper licensing, general liability and workers compensation insurance, manufacturer certifications, and a track record of satisfied customers.
Look for contractors who are GAF Master Elite certified or hold similar manufacturer certifications, which indicate training, quality standards, and access to enhanced warranty options. Pay your deductible directly to your contractor and keep the receipt, canceled check, or credit card statement as proof of payment. Your insurance company may request this documentation before releasing your recoverable depreciation. After roof repairs are complete, submit your final invoices to collect the holdback amount.
Signs of Storm Damage You Might Miss
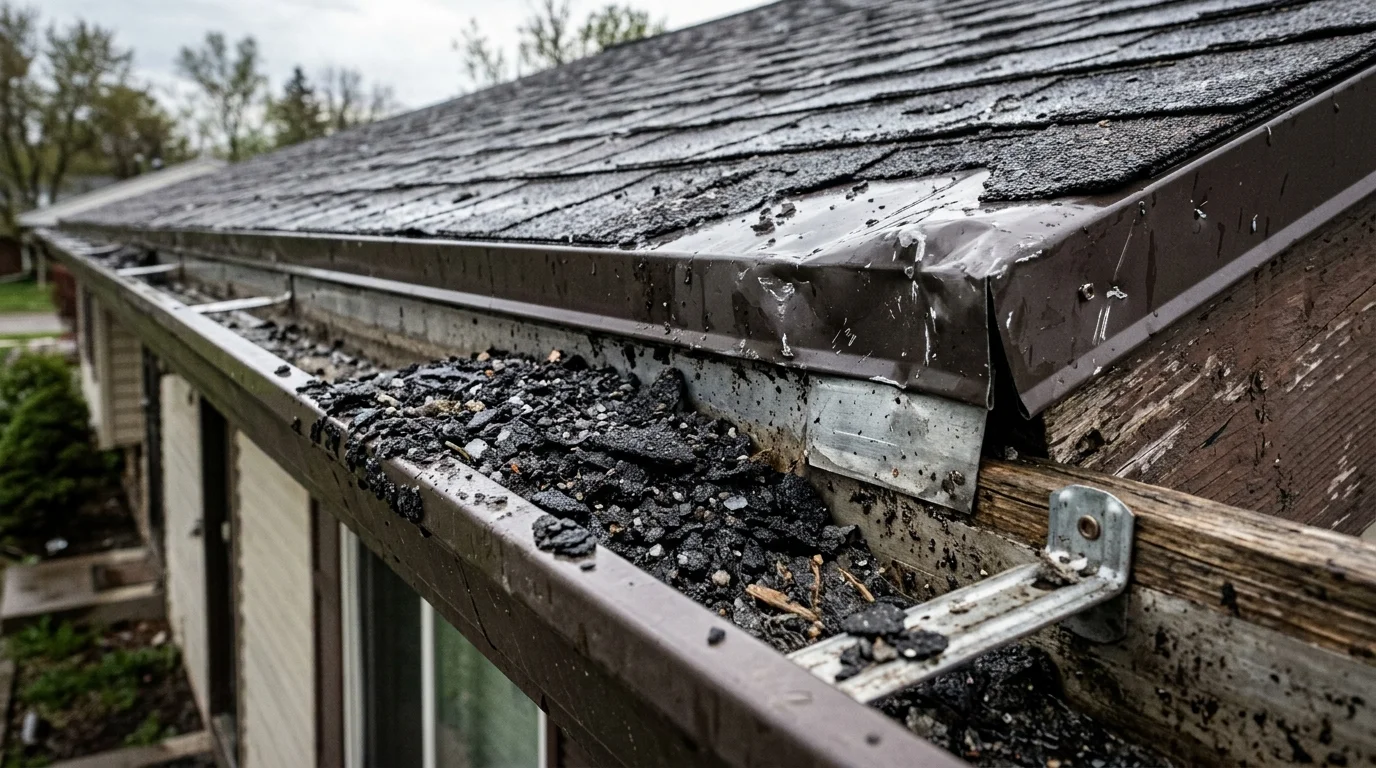
Not all storm damage is obvious. Some of the most serious problems are easy to miss without a trained eye, and damage that goes unaddressed can worsen significantly over time.
Check your gutters and downspouts for granule buildup. Granules are the small, gritty particles that coat asphalt shingles and protect them from UV damage. After a hailstorm, significant granule loss shows up as sand-like material in your gutters. Some granule loss is normal as roofs age, but a large deposit after a storm indicates your shingles took hits that compromised their protective layer.
Look for dents on metal components including vents, flashing, and gutter sections. If these soft metal parts show impact damage, your shingles likely do too. From the ground, damaged shingles may appear as dark spots or areas where the texture looks different from surrounding shingles. Lifted or curled shingle edges indicate the seal between shingles has been broken, leaving them vulnerable to wind uplift and water intrusion.
Water stains that appear on your ceilings days or even weeks after a storm indicate that water found a path into your home and traveled along rafters or through insulation before showing up inside. The source of the leak may not be directly above the stain, which is why professional inspection is so important. For a closer look at telling hail damage from wind damage, see our guide to storm damage roof repair in Allen, TX.
Common Mistakes to Avoid After Storm Damage
Waiting too long to file a claim tops the list of costly mistakes. Even though Texas law provides a one-year deadline, delays allow evidence to degrade, make causation harder to prove, and may raise questions about the urgency of the damage. File within days of the storm, not weeks or months.
Making permanent repairs before the adjuster visits can backfire. While you should take reasonable steps to prevent further damage, completing a full repair before the insurance company documents the damage may result in a denied or underpaid claim. Temporary measures like tarping are appropriate; permanent fixes should wait.
Do not throw away damaged materials until your adjuster gives approval. Shingles, flashing, and other debris may need to be examined as part of the claims process. Keep damaged materials in a safe location until you receive confirmation that they are no longer needed.
Avoid working with any contractor who offers to waive your deductible. This is not a favor; it is insurance fraud that puts both you and the contractor at legal risk. Under Texas HB 2102, contractors who waive deductibles face fines up to $2,000 and up to 180 days in jail, and homeowners who knowingly participate can face the same penalties. Your insurer can also deny your entire claim if they discover this arrangement.
Get Help After Storm Damage Now!
If your roof has been damaged by hail, wind, or severe weather, do not wait to find out how bad it is. Contact Pickle Roofing Solutions for a free storm damage inspection. Our experienced team will document all damage, provide a detailed estimate, and help you understand your options for repair or replacement. We can meet with your insurance adjuster to ensure nothing gets overlooked and guide you through every step of the claims process. Call (972) 954-7186 or visit our contact page to schedule your inspection today and take the first step toward restoring your roof.
Frequently Asked Questions
How long do I have to file a roof damage claim in Texas?
Texas law provides one year from the date of loss to file a claim. However, filing immediately is strongly recommended. Delays allow evidence to deteriorate, make causation harder to prove, and may raise questions about the urgency of the damage. You can always withdraw a claim if you decide not to proceed, but you cannot file one after the deadline passes.
Will filing a storm damage claim raise my insurance rates?
In Texas, weather-related claims for hail, wind, or fallen trees typically do not raise individual homeowner's rates because these events are classified as acts of nature rather than the homeowner's fault. However, multiple claims within a short period may trigger review by your insurer. Do not let fear of rate increases prevent you from filing a legitimate claim for significant damage.
Should I get a roof inspection even if damage is not obvious?
Yes. After any significant hail event with stones one inch or larger, schedule a professional inspection even if you do not see obvious damage from the ground. Hail can bruise shingles in ways that are invisible from thirty feet away but will cause premature failure over the following months. An inspection takes about an hour and gives you a clear answer either way.
How long does the storm damage repair process take?
Most residential storm damage restoration projects take two to four weeks from initial inspection through completed repairs, including insurance approval time. The timeline depends on the severity of damage, adjuster availability, and contractor scheduling. During peak storm season, adjusters and contractors may be backlogged, which can extend the timeline. Acting quickly to schedule inspections and file claims helps minimize delays.
Can I choose my own roofing contractor?
Yes. Texas law allows you to select any licensed contractor you choose. Your insurance company cannot require you to use a specific contractor or their preferred vendor network. Choose a contractor based on their qualifications, local reputation, manufacturer certifications, and your comfort level, not based on insurance company recommendations that may prioritize cost over quality.
What if my claim is denied?
If your claim is denied, request a written explanation detailing the specific reasons. Under Texas Department of Insurance guidance, insurers cannot issue vague denials. Review the explanation against your policy language and documentation. You can appeal the decision, request a second inspection with your contractor present, hire a public adjuster to represent your interests, or consult with an insurance attorney if you believe the denial is unjustified.
About Pickle Roofing Solutions
Pickle Roofing Solutions is a GAF Master Elite certified roofing contractor serving Allen and communities throughout Collin County. Our team has guided hundreds of North Texas homeowners through storm damage recovery, from initial damage assessment through completed repairs. We provide honest inspections, detailed documentation for insurance claims, and quality workmanship backed by manufacturer warranties. When storms hit Allen, we are here to help you protect your home and navigate the path to full restoration.